BEST BAKED CHICKEN THIGHS EVER

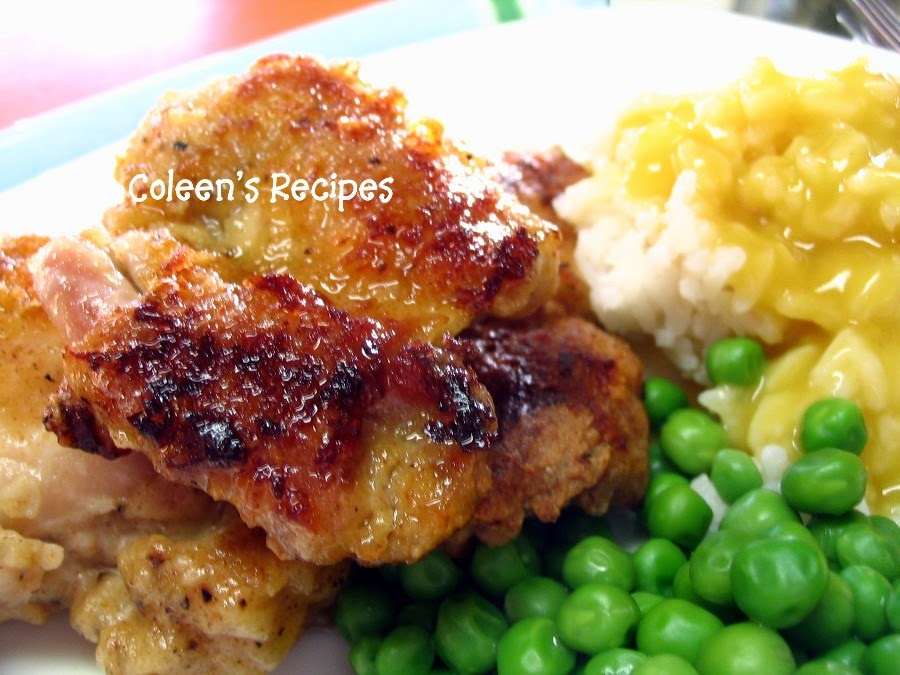
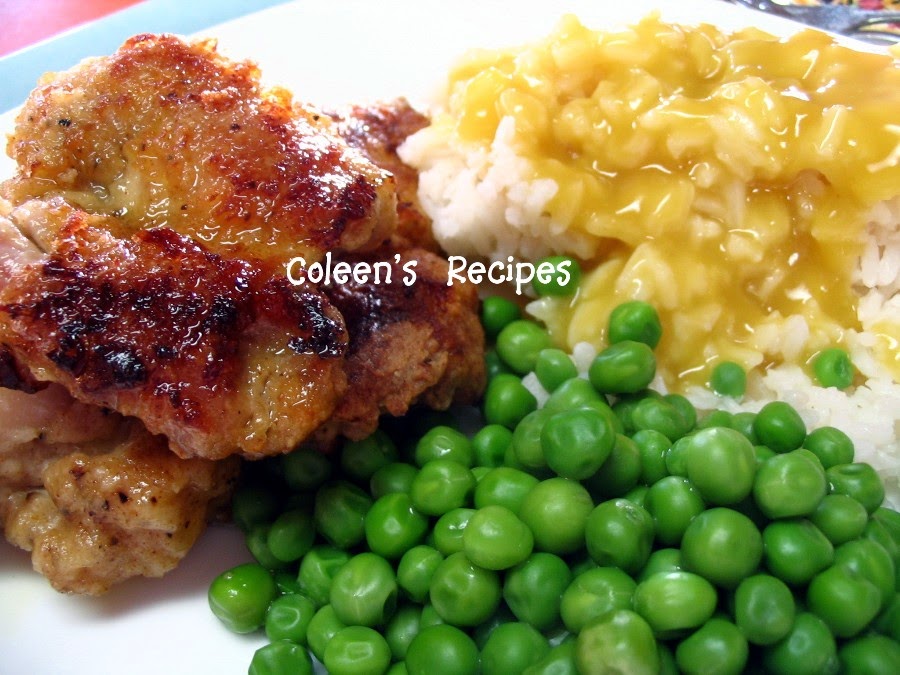
I kid you not, these chicken thighs are the BEST of the BEST and quick and easy to make. They are SUPER moist, SUPER tender and SUPER flavorful. We couldn't stop eating them and they are going straight to the TOP of my FIVE STAR recipe list.


8 boneless skinless chicken thighs  (thawed)
Milk to cover
1/4 cup melted butter

1 tablespoon Coleen's seasoned salt (click here for recipe)
3/4 teaspoon coarse ground black pepper
1/2 teaspoon salt
1 cup flour
2 teaspoons paprika

Put the chicken in a large bowl and cover with milk (I use 2%). Let this sit in fridge for 30 minutes.

Meanwhile, mix the flour, seasoned salt, salt and pepper, and paprika until well mixed. NOTE: I've only ever tried this with my own seasoned salt mixture (click here for recipe)I can't tell you if any other seasoned salt mixtures would taste as good.

Drain the milk off of the chicken and put the chicken in the flour mixture and toss to coat evenly.

Preheat your oven and an EMPTY 9 x 13 baking dish to 400°. When the oven hits 400°, put the melted butter in the hot baking dish, spreading it around so the entire bottom of the pan is covered.

Set the floured chicken on the melted butter and put back in the oven. Bake for 20 minutes. Turn chicken over and bake another 20 minutes. That's it!!

Chicken comes out SUPER tender, SUPER moist and SUPER flavorful.


ENJOY !!!


Share:

Crock pot Salsa Chicken


I have been making this recipe for years and did not realize it wasn't up on the blog! The shame! The shame!

This recipe is so easy and only requires 3 ingredients! All you have to do is place the chicken breasts in the crock pot. Top it with your favorite salsa and some taco seasoning. Then let your crock pot work it's magic! When it is done, shred the chicken and mix it with the salsa mixture. So yummy!

I served it with assorted sweet bell peppers I cooked in the air fryer but this would be delicious on cooked cauliflower rice as well! You do need to add 1 healthy fat to this dish. Sour cream or avocado are excellent choices! I hope you enjoy this super duper easy recipe as much as me!

Crock Pot Salsa Chicken

Ingredients:
3 lbs chicken breasts, boneless, skinless (6 Leaner)
1 cup red salsa (16 Condiments)
1 tsp taco seasoning (2 Condiments)

Directions:
Place chicken in the crock pot. 
Top with salsa and taco seasoning.
Cook 6 to 8 hours on LOW or on 4 hours on HIGH.
Shred chicken with fork and stir chicken with salsa mixture.
Serve with your choice of Greens and avocado or sour cream.
This freezes well too!

6 Servings with
1 Leaner and 3 Condiments per serving ~ about 3/4 cup
225 Calories ~ 6 g Fat ~ 3 g Carbs ~ 38 g Protein

* Still need 3 Greens and 1 Healthy Fat per serving such as 1.5 oz of avocado or 2 tbsp sour cream


Share:

ONION STRINGS

This quick fix addition to a burger, or salad is oh so addicting!!!
You can make this crunchy, salty, sweet-ish, treat in batches and keep them warm in the oven. There are a million and one ways to serve onion strings!!


1 large sweet onion (I like Vidalia's)
1 cup buttermilk
1 cup flour
1/2 teaspoon salt 
1/2 teaspoon black pepper
1/4 teaspoon cayenne pepper

Peel the onion and slice it as thin as you can. A mandolin works well here, but I don't have one, so I just slice the onion as thin as I can.

Soak the onion slices in the buttermilk for about an hour, making sure you press the slices down into the liquid. When I'm in a hurry, I've done this step in 1/2 hour and they turned out great.

In another bowl, mix the flour, salt, pepper and cayenne and set aside. Heat a quart of vegetable oil to 375F. 

Using tongs, remove a handful of onion slices from the buttermilk and put them into the flour.  Toss around gently to coat. 

With the tongs, take the slices out of the flour and tap the tongs on the edge of the bowl to remove excess flour from the onion pieces.

Put the floured slices into the hot oil and stir gently to separate the slices. These will be golden brown in a minute or so, so watch them carefully.

Drain on paper towels and salt them to taste.  Repeat batches until all onion strings are cooked.


ENJOY !!!

Share:

Spinach Pizza Crust or Wraps


Move over cauliflower crusts, there is something equally delicious! Spinach pizza crusts or wraps! Another low carb pizza alternative! Add your favorite toppings and it tastes like pizza on flatbread. Yum, yum, yum! This recipe was originally shared by Ursula Garcia awhile back and I love how it is so versatile! It produces a flexible crust which makes perfect pizza crusts or wraps!


For the chicken, bacon, and ranch wrap:

I added 2.5 oz of rotisserie style chicken breasts (1/2 Leaner with turkey bacon) I picked up from the grocery store, 1 slice of turkey bacon (1/2 oz subtracted from protein), 1/4 cup sliced tomatoes (1/2 Green), 1/2 cup lettuce (1/2 Green) and 1 1/2 tbsp Bolhouse Classic Ranch Dressing (1/2 Healthy Fat). With the spinach wrap, it makes 1 full Lean and Green meal!


Look at that beautiful green crust!


To begin the recipe, add spinach, mozzarella cheese, and dried basil to your food processor. Blend well. Stir in egg beaters until completely combined.


Pour mixture onto parchment paper forming a circle making it thin as possible. I like to use another piece of parchment paper on top of the mixture to flatten it out.


Carefully lift the parchment paper off of the mixture.


Bake at 425 degrees for 15 to 17 min or until edges get brown.


If making a pizza, top with your favorite toppings and return to the oven for about 5 more min or until cheese has melted.

For wraps, let cool a few more minutes and then add your desired fillings. A healthy dinner or lunch in less than 30 min! Yes please!


Spinach Pizza Crust or Wraps

Ingredients:
Crust
2 cups spinach (2 Greens)
1/2 cup reduced fat mozzarella cheese (1/2 Lean)
1/2 tsp dried basil (1/4 Condiment)
1/4 cup egg beaters or egg white substitute (1 1/3 Condiments)

Toppings for Margherita Spinach Pizza
2 tbsp Rao's or approved marinara sauce (1 Condiment)
1/2 cup reduced fat mozzarella cheese (1/2 Lean)
1/2 cup or 3.17 oz sliced tomatoes (1 Green)
1 tbsp reduced fat feta cheese (1/2 Condiment)

Directions:
Preheat oven to 425 degrees.
Blend spinach, mozzarella cheese, and dried basil in a food processor.
Stir in egg beaters.
Spread mixture on parchment paper.
Tip: I laid another piece of parchment paper over the mixture to flatten it out. Then slowly lifted the parchment paper. 
Bake for 15 to 17 min or until edges are brown.
Add marinara sauce, mozzarella cheese, sliced tomatoes, and feta cheese. 
Bake for an additional 5 more minutes or until cheese has melted.

Spinach crust only:
1 Serving with
1/2 Lean, 2 Greens, and 1.5 Condiments

Margherita Spinach Pizza:
1 Serving with
1 Lean, 3 Greens, and 3 Condiments per serving


Share:

Cali'flour Fries

These "fries" made from the Cali'flour Flat breads are so delicious! Who would've thought they would make awesome "fries"? I bet these would pair nicely with a yummy crisp lettuce wrap!

Serve these "fries" with 1 more Green and 2/3 Lean such as:

2 eggs
3.3 oz 93% ground beef or steak
4 oz of chicken breasts
4.6 oz shrimp, tilapia, or 99% ground turkey

I seasoned the "fries" with Weber Garlic Sriracha Seasoning and added a tbsp of reduced sugar ketchup on the side. So good! Give them a try!


Cali'flour Fries

Ingredients:
2 Cali'flour Flat breads (1/3 Lean, 2 Greens)
Optional: 1 tbsp reduced sugar ketchup (1 Condiment)

Directions:
Preheat oven to 400 degrees.
Pre bake the Cali'flour flat breads in the oven on a vented pizza pan, pizza screen, or on a nonstick cookie sheet lined with parchment paper for about 5 min.

Remove from oven and cut into strips to create fries. Season with spices of choice. Place back into oven and bake an additional 5 to 8 more min. Remove from oven and let cool for a few more min. Serve with ketchup.

1 Serving with
1/3 Lean, 2 Greens, and 1 Condiment (reduced sugar ketchup)


Share:

Caprese Spaghetti Squash Nests


Roasted cherry tomatoes, mozzarella cheese, spaghetti squash, and fresh chopped basil make this dish a delicious refreshing meal! The muffin cups make this a fun twist on Caprese. You can easily make this into one larger casserole, but I thought it would be really cute to make little spaghetti squash nests using muffin cups. You know... with Spring being around the corner and all. Before putting the cheese over the tomatoes, my 6 year old leans over to tell me that the roasted cherry tomatoes look like eggs in a nest. By golly, yes you are right! There you go! Perfect for Spring!


Begin the recipe by preparing and cooking your spaghetti squash. You can prep your squash the day before! Cooked squash can lasts 3 to 5 days in the fridge. I included two ways in the recipe below, oven method or slow cooker method. I love roasting my spaghetti squash in the oven which brings out the subtle sweetness of the squash. Using your Instant Pot, air fryer, or microwave or other options as well. Choose your preferred cooking method and reserve 2 cups of spaghetti squash strands for this recipe. Save the rest for another use.


Mix 2 cups of spaghetti squash with salt, pepper, garlic powder, and 3 tbsp egg beaters. Scoop 1/4 cup of spaghetti squash into each muffin cup.


Press down on the bottoms and sides to create nests. Place in a preheated oven for 20 min.


Put cherry tomatoes on a baking sheet lined with non-stick foil or a silicone mat. Spray with non-stick cooking spray. Sprinkle with salt and pepper. Bake for 15 to 20 min. Save time by roasting them with the spaghetti squash nests.


Scoop roasted tomatoes into each cup. I had 24 cherry tomatoes so I put 3 in each cup. Top each cup with 2 tbsp mozzarella cheese . Bake for an additional 8 to 10 min or until cheese has melted.


Garnish with chopped fresh basil. You can enjoy 4 of these delicious nests with 1/2 a Lean more! I served these with 3 oz of rotisserie style chicken breast meat (bones and skin removed) I picked up from the grocery store. So yummy!


Caprese Spaghetti Squash Nests

Ingredients:
For the Nests:
1 medium spaghetti squash ~ 
reserve 2 cups cooked for recipe (4 Greens)
1/4 tsp salt (1 Condiment)
1/4 tsp black pepper (1/2 Condiment)
1/4 tsp garlic powder (1/2 Condiment)
3 tbsp liquid egg whites (1 Condiment)

For the Filling:
1 cup cherry tomatoes ~ about 5.26 oz (2 Greens)
1/4 tsp salt (1 Condiment)
1/4 tsp black pepper (1/2 Condiment)
4 oz reduced fat mozzarella cheese, shredded (1 Lean)
1/4 cup basil, chopped (1/2 Condiment)

Directions:
Oven Method for Spaghetti Squash
Preheat oven to 375. Wash spaghetti squash.
With a sharp knife, slice spaghetti squash in half lengthwise. If the squash is too hard to cut, puncture several holes around the spaghetti squash and microwave for 3 to 5 min to soften a little. Let cool before cutting in half. Scoop out the seeds and stringy flesh. Spray lightly with cooking spray. Place squash cut side down. Bake for 40 to 45 min. Let cool. Shred the flesh into noodles with a fork. Reserve 2 cups for recipe.

Slow Cooker Method for Spaghetti Squash
Wash spaghetti squash. Puncture several holes around the spaghetti squash. Place the whole spaghetti squash in the slow cooker with 1 cup water. For a 3 to 4 lb medium squash cook on LOW for 5 to 6 hours or 3 to 4 hours on HIGH. Let cool for about 15 to 30 min before slicing in half. Scoop out seeds. Shred the flesh into noodles with a fork. Reserve 2 cups for recipe.

To Make Spaghetti Squash Nests and Roasted Tomatoes
Preheat oven to 400. 
Spray a muffin pan with non-stick cooking spray.
In a medium sized bowl, combine spaghetti squash, salt, pepper, garlic powder, and liquid egg whites. Transfer 1/4 cup spaghetti squash to each muffin cup, pressing down on the bottoms and sides to form nests. Place in the preheated oven and bake 18 to 20 min.

Line a baking sheet with non-stick foil or a silicone mat. Spread tomatoes on baking sheet. Spray with non-stick cooking spray. Add salt and pepper. Bake for 15 to 20 min until tomatoes are soft. These can be put in the oven the same time as the spaghetti squash nests since they cook at the same temperature.

Scoop roasted tomatoes in each cup. Sprinkle 2 tbsp of cheese per cup. Bake for an additional 8 to 10 min or until cheese has melted. Let cool for a few min. Carefully scrape around the edges of each nest with a butter knife and remove from the tin. Place on a serving platter. Sprinkle with fresh basil.

2 Servings with
1/2 Lean, 3 Greens, and 2.5 Condiments per serving (4 Nests)

Serve with an additional 1/2 Lean such as: 
2.5 oz 93% lean ground beef or steak
3 oz chicken breasts or 3 oz Jennie-O Sweet Italian turkey sausage (need 1/2 Healthy Fat)
3.5 oz shrimp, tilapia or 99% lean ground turkey (need 1 Healthy Fat)

Slightly adapted from:

Tasty


Share:

MICROWAVE BROWNIE FOR ONE !!

 They say that you are not supposed to reward yourself with food...OK, I get that. But every once in a while, I crave something deeply chocolate, deeply warm and gooey. This recipe fills that bill perfectly and since it is only a single serving, there isn't a whole pan of guilty calories calling your name the rest of the day.

 Pure Heaven in 5 minutes

I've been looking for a single serving brownie recipe like this for a long time because Hubby doesn't like brownies...go figure😉 

MICROWAVE BROWNIE FOR ONE
.
1/4 cup all purpose flour
1/4 cup brown sugar
1/8 teaspoon baking powder
2 tablespoons cocoa powder
3 tablespoons milk
1 tablespoon butter (room temperature)
1 tablespoons pecans (optional)
2 tablespoon chocolate chips (or 1 tablespoon mini chocolate chips)
.
In a small microwave safe bowl, mix everything together until smooth (mixture will be very thick). Cook in the microwave.
.
Now here comes the only tricky part of the recipe. Total cooking time in the microwave is 1 to 2 minutes depending on how powerful your microwave is. My microwave is a 1000 watt machine and it takes 1 minute 20 seconds. You will have to watch your microwave  carefully the first time you make this treat, so you don't over bake it (use the toothpick test for doneness the first time). LET THE BAKED BROWNIE SIT FOR ABOUT A MINUTE BEFORE YOU EAT IT.
.
NOTE: I am embarrassed to say I know this recipe by heart now. Any flavored chocolate, peanut butter, white (etc.) chips will work well.
.
NOTE: The recipe doesn't say you have to, but I bake mine in a little ramekin that I spray with cooking spray.

ENJOY !!!
Share:

HASSELBACK APPLES

Hasselback Potatoes (a recipe originating in Sweden) have been around for a while, but some cooking genius came up with the idea for Hasselback Apples.....and they are delicious!!!


HASSELBACK APPLE

2 large, firm apples (peeled, cored, cut in half)

Cut slices into each apple half, cutting ALMOST through like this. Using spoon handles on either side of the apples (to stop the slices evenly) makes it easier.


Place the prepared apples in a glass baking dish that has been sprayed with cooking spray, flat side down.

In a small bowl, mix 2 tablespoons sugar, 2 tablespoons melted butter and 1 teaspoon of cinnamon. Mix well and brush all over the cut apples, like this:


Cover with foil and bake at 400F for 20 minutes. Remove the foil and bake for another 15 minutes.  

Take out of the oven and let sit at room temperature for 10 minutes. 

When they come out of the oven, the slices will have separated just a little.

Mix 3 tablespoons sugar, 1 1/2 tablespoons of melted butter, 1/4 teaspoon cinnamon, 2 tablespoons old fashioned rolled oats, 1 teaspoon flour, 1/4 teaspoon kosher salt.

Very carefully pry each apple slice open (just a little) and put some of the oat-sugar mixture in between the hot slices. Spoon a little of the liquid (that has formed in the bottom of the pan)over the whole apple and return to the oven for another 10 to 15 minutes or until tender.

If you want the apples to have more "color", put them under the broiler for the last 30-40 seconds.

Serve with whipped cream or ice cream.


Serves Four

ENJOY !!!


Share:

CROCKPOT SHORT RIB TACOS

Today's post came about one day when I had some BONELESS beef short ribs thawed out and I had no clue what to do with them.  I decided to make boneless short rib tacos and they were SO GOOD, I will definitely be making these again!!


Start with 2½ pounds of BONELESS beef short ribs. I'm sure every butcher shop has their version, but the ones I use look like this and they are about 1/2" thick:


In a small cup, mix 3 teaspoons of chili powder, 1 teaspoon of ground cumin (don't leave that out), 1 teaspoon of salt, 1/4 teaspoon of black pepper, 1/4 teaspoon of oregano and 1 tablespoon of dry onion flakes. Mix well and sprinkle both sides of the meat evenly as possible (no need to brown the meat!!)  

Put the seasoned meat in the crockpot in single layer and top with a 4 ounce can of undrained mild green chile's (I use Ortega).


Cook on low for 6 hours or until they are fall apart tender (it really depends on how thick the meat is). Don't add any liquid.


Remove the meat from the crockpot and cover with foil to keep warm for a few minutes. There will be about a cup of broth in the bottom of the crockpot...thicken it and coat the meat with the "taco gravy". Each boneless short rib makes one awesome taco!!


The leftovers (sliced on the bias) made fantastic grilled beef and cheese subs.

ENJOY !!!

Share:

Pistachio Shake

Looking for a yummy shake to enjoy on St. Patty's Day? Try this green shake! Baby spinach gives this shake it's nice green color without any added food coloring. I like to use baby spinach instead of regular spinach for shakes because it has a milder sweeter taste than regular spinach. What is great is that spinach is a super food with loads of nutrients, tons of health benefits, and only 7 calories for 1 cup! Just remember to subtract from your 3 Greens for the day! Adding spinach to your shakes is a great way to sneak your veggies in if you are having a hard time eating them all at once!


The sugar free pistachio pudding is for added flavor. I love pistachios and I thought the color would be fitting for St. Patty's Day! I added 2 tbsp Reddi Whip for an additional Condiment, but you can definitely leave it out. Enjoy!


Pistachio Shake

Ingredients:
1 French Vanilla Shake (1 Fueling)
1 1/2 tsp Sugar free pistachio pudding (1 1/2 Condiments)
1 cup baby spinach (1 Green)
1/2 cup unsweetened cashew milk (1/2 Condiment)
1/2 cup water
ice

Directions:
Blend all ingredients in a blender until well blended. Serve.

1 Serving with
1 Fueling, 1 Green, and 2 Condiments


Share:

Popular Recipes

Labels

Blog Archive

Featured Post

Recipe Sweet Spicy Tofu

Tofu, with its versatile nature, offers a canvas for culinary creativity. One delightful rendition of this ingredient is the Spicy Sweet Tof...